Labour
Logging Times
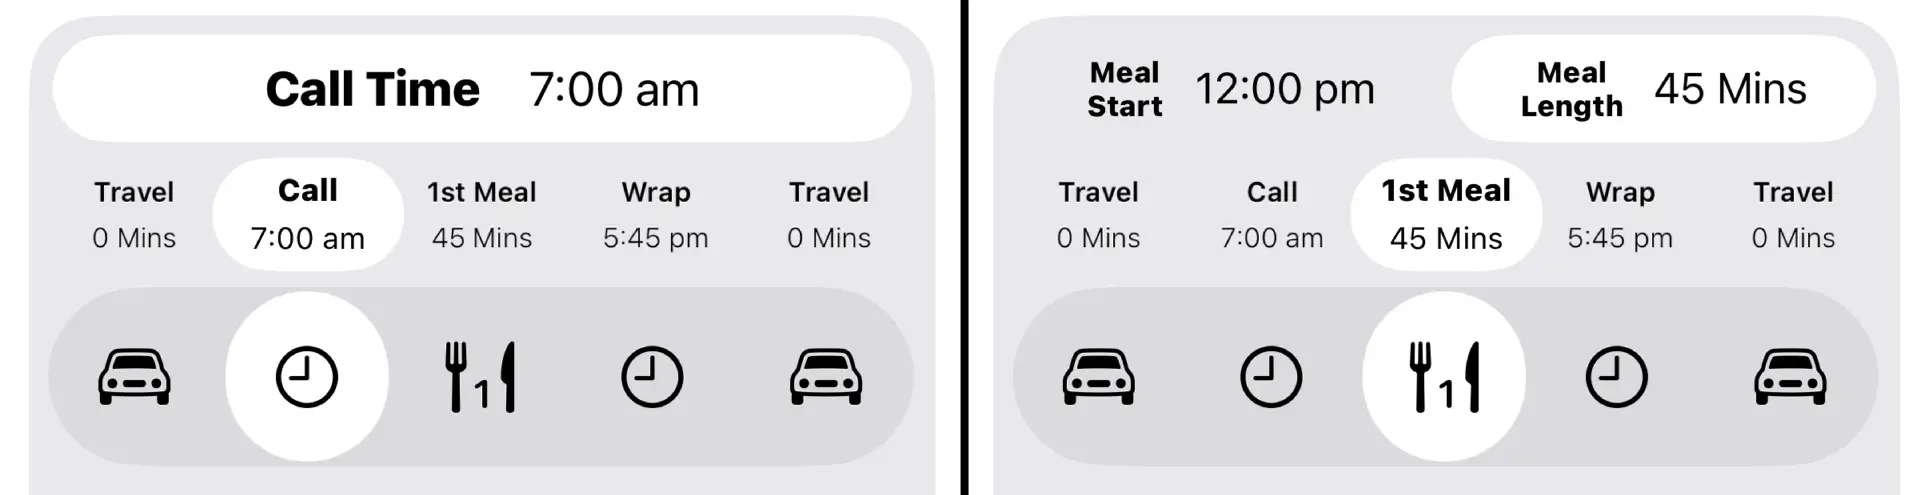
Log your AM Travel, Call Time, Meal Break, Wrap Time and PM Travel using the selector. You can tap on the icon or the text to change your selection. The Time Slider will update depending on the value you have selected. Please note that Meal Breaks have two selections, Meal Start and Meal Length.
Time Slider
Use the time slider to adjust your times.

You can slide it left/right as you’d expect and the times will update. This is great when you need to quickly change the logged time.
You can also tap to the left/right and it will increment by 6/15 Mins. This is for when you need finer control.
Night Shoots
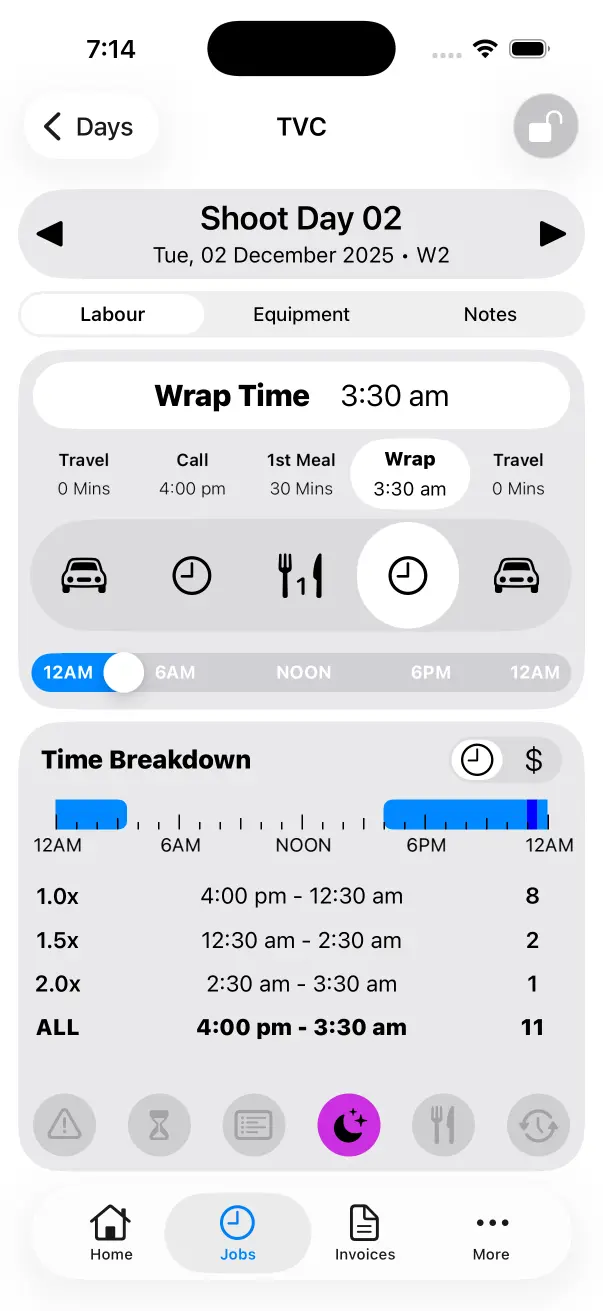
The best way to think about the Time Slider is that it represents 24 Hours of the Day. If you slide it to the right it’s later in the day, if you slide it to the left it’s earlier in the day.
To log a Night Shoot or Wrap Time after midnight, select Wrap Time and slide the Time Slider to the left to select 3:30am or whenever you finish. Crew Call knows that you’re logging a Night Shoot or a Day/Night and will process it as such. This assumes that your Call Time is already set to a time after 3:30am, for example a 4:00pm Call Time.
Once you’ve logged your times, double check your Meal Break as it may have been altered when you slid your Wrap Time to the start of the day.
Below is an example of a logged Night Shoot:
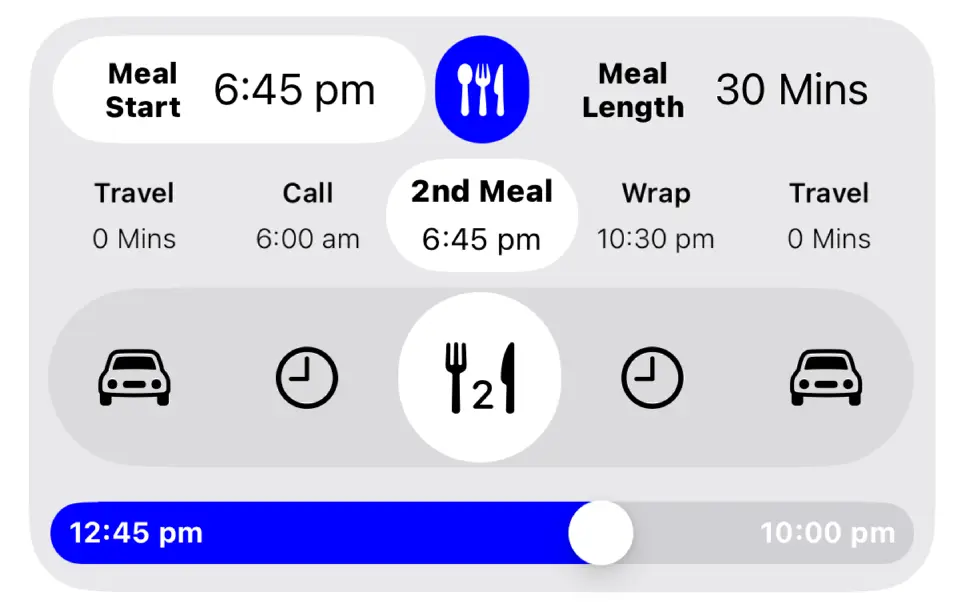
Second Meal Break
You can toggle between 1st Meal and 2nd Meal when you double tap on the Meal Break Icon in the selector.
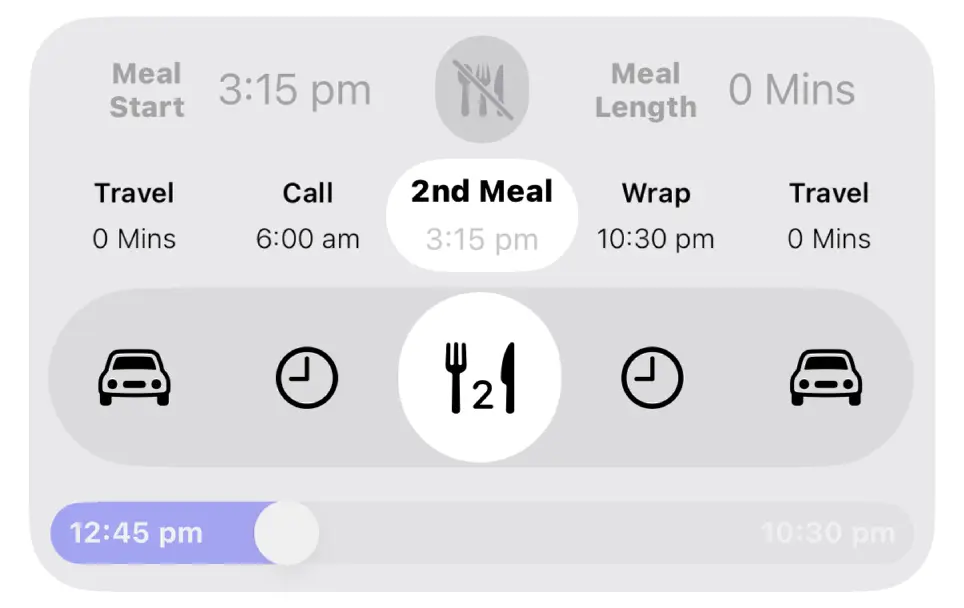
Tap the 2nd Meal Button to enable a 2nd Meal Break. This tells Crew Call that a 2nd Meal is applicable for the current Work Day. You can then log Meal Start and Meal Length for the 2nd Meal Break as you normally would.
Time Breakdown
The top section shows a Work Day Timeline, this is designed to give you a quick visual overview of the Work Day.
Teal is used for Travel.
Light Blue is used for Time Worked.
Dark Blue is used for Meal Breaks.
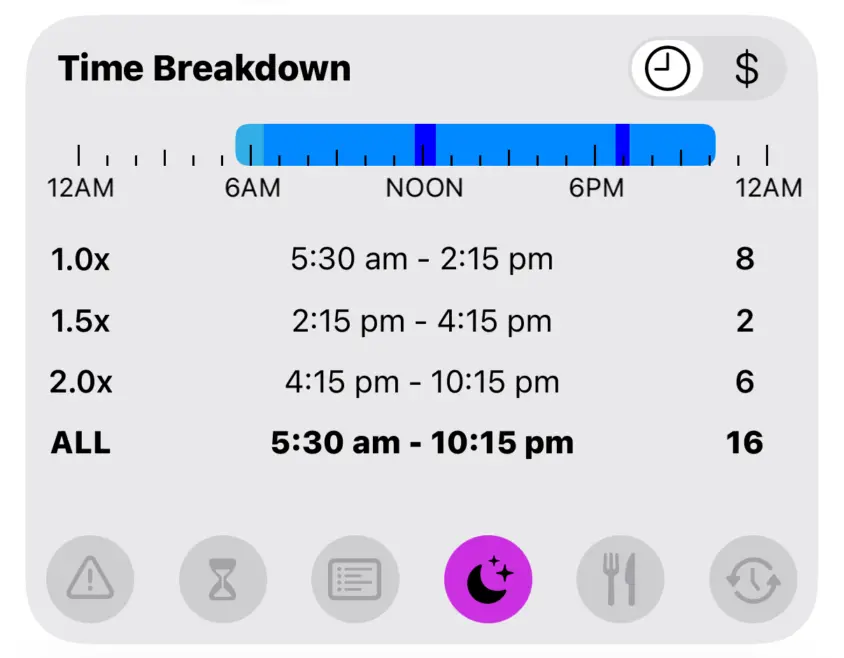
The bottom section breaks down Hours Worked based on your Overtime Calculation. You can see what hours were Single Time and how many hours you worked of 1.5x and 2.0x, etc.
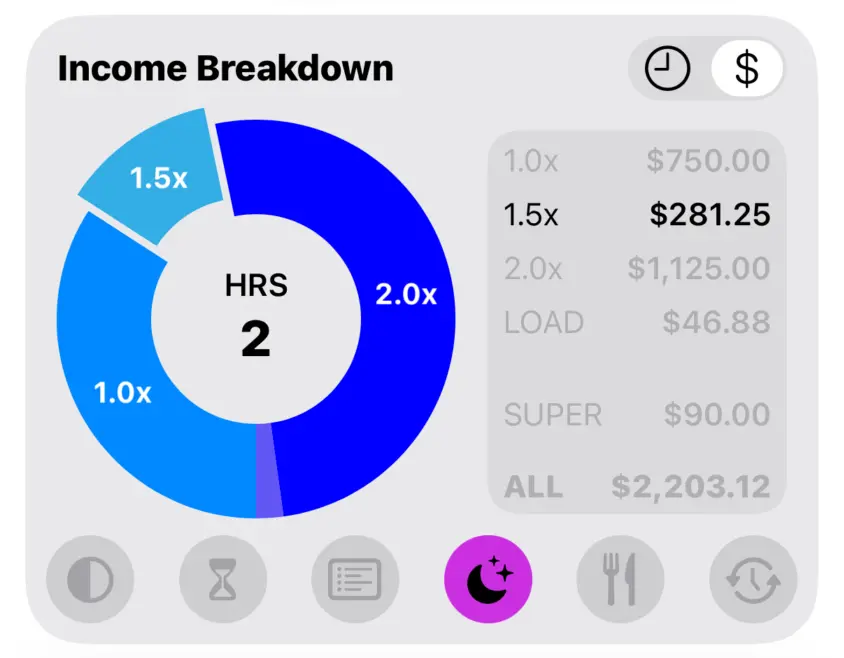
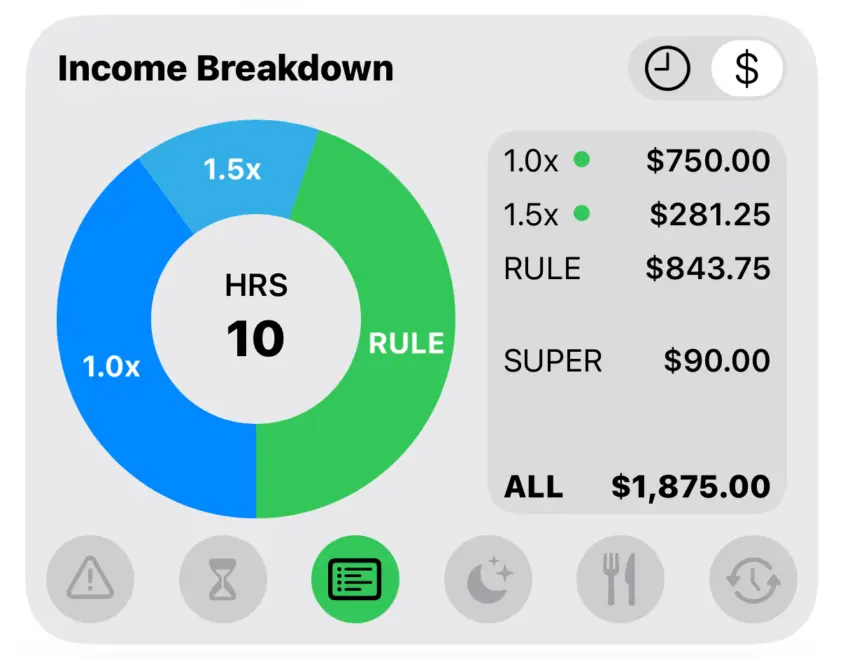
Income Breakdown
The left section is a Pie Chart that gives you a visual overview of which penalties made up your income for the Work Day. The right section displays dollar values for each penalty.
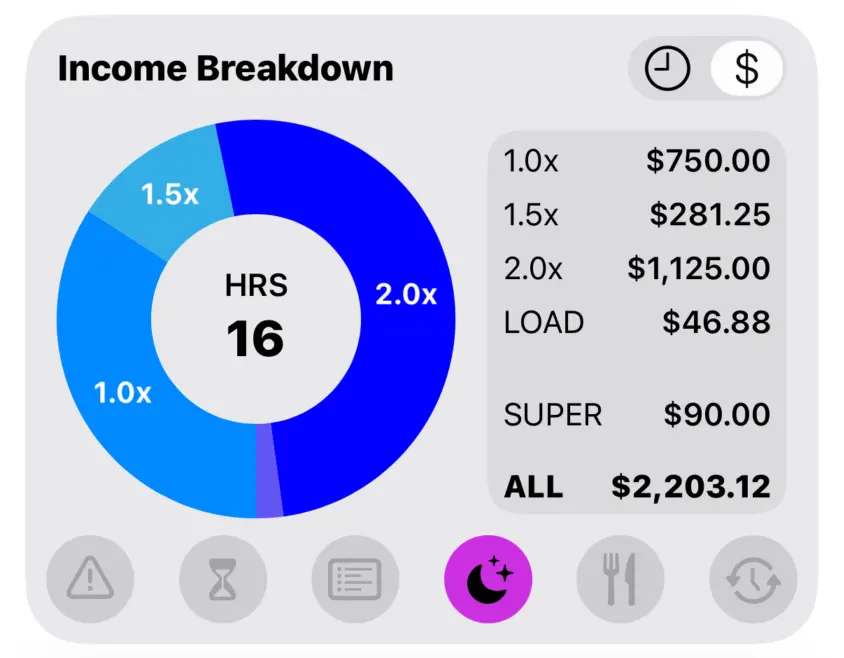
The dollar value for LOAD in the right section is used for all Loadings that triggered additional income for this Work Day. This includes Night Loadings and Meal Penalties.
If you tap on a section of the Pie Chart it will highlight the corresponding penalty and income earned for that penalty.
Work Day Popups
The very bottom section of the Labour Screen is for Work Day Popups. Each button represents a modificaton to Work Day Income.
When a button is highlighted that means the corresponding modifier is active. Tap any of these buttons to show a popup which provides more information.

Flat Rate
Flat Rate is disabled by default, this means the Work Day will use the Overtime Calculation for Labour Income.
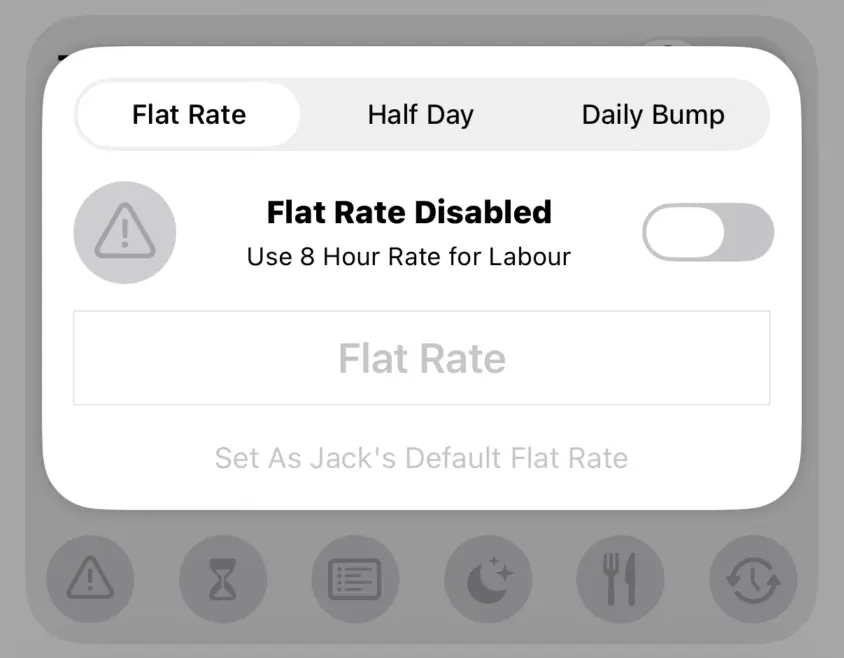
When enabled, the Work Day will use the Flat Rate for it’s income. Any penalty rates and overtime that is normally calculated will be ignored. This is often used for Travel Days or when production has negotiated a fixed rate with you for a job. Flat Rate can be changed on a day-to-day basis by entering a different value into the Text Field.
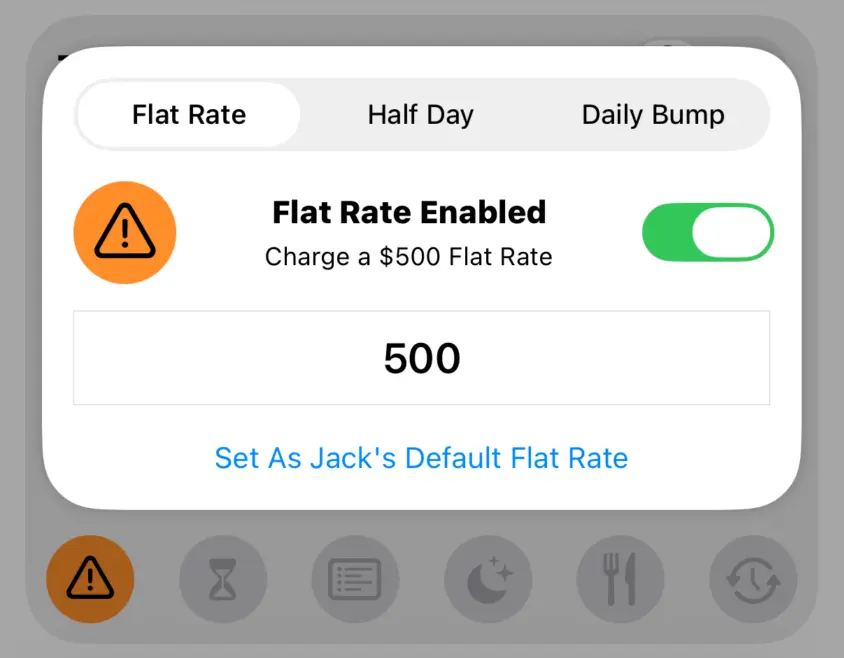
Best practice is to enter the Flat Rate that you will use most often and tap Set As Default Flat Rate. Once a default has been set, any new Work Day that you create will have this Flat Rate assigned. All you need to do is enable it.

Flat Rate can be changed on a day-to-day basis by entering a different value into the Text Field. Tap the Flat Rate Button to reset the current value to your Default Flat Rate.

Half Day Rate
Half Day Rate is used to charge a percentage of your Labour Rate for the current Work Day. Your Labour Rate is set when Editing a Job.
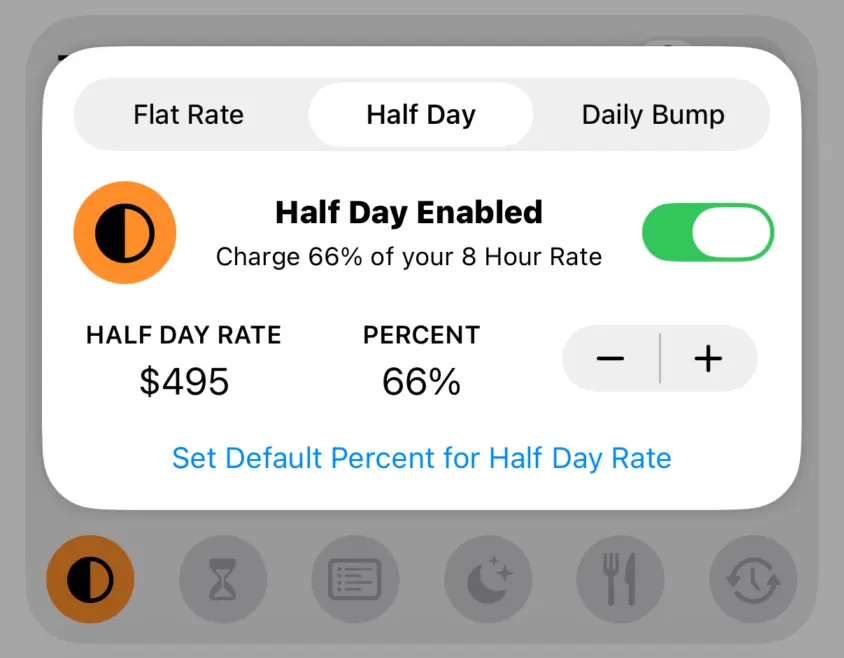
Setting a Default Half Day Rate and resetting the current value works the same as Flat Rate. Please read the Flat Rate Section above for reference.
Daily Bump
Daily Bump is used when a crew member needs to step up within their department for a single day. For example, a 2nd AC may work as a 1st AC on a 3rd Camera Day, thus their Day Rate needs to change just for this shoot day to match their new role and responsibility.
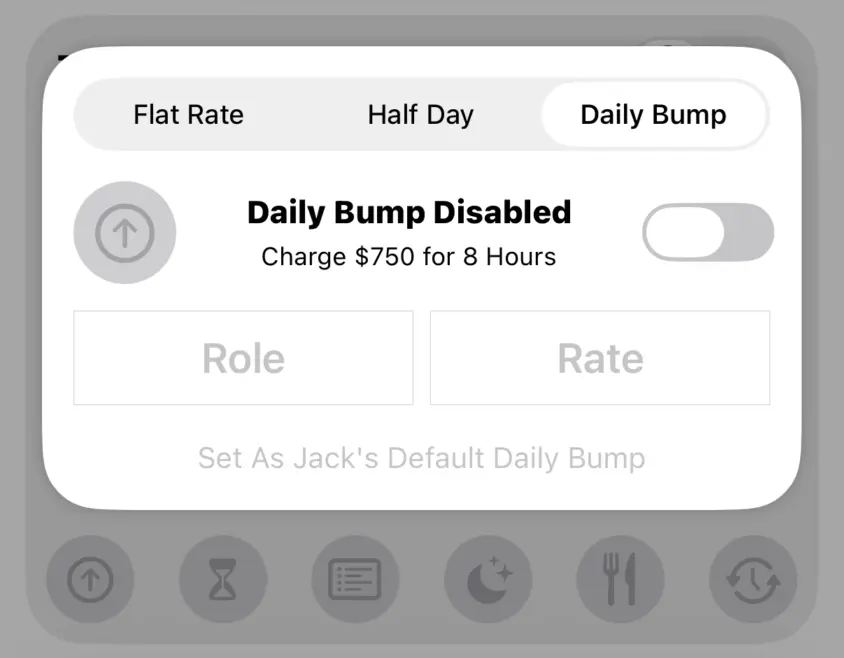
Enable Daily Bump and set a different Role and Rate. The Overtime Calculation for the Job will still be used, it will just be calculated using the Daily Bump Rate instead.
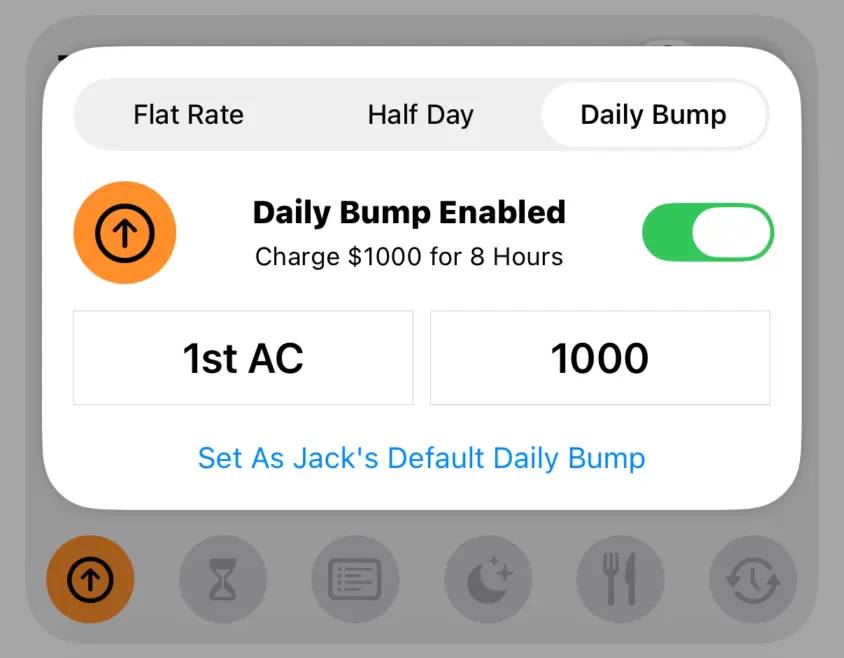
Setting a Default Daily Bump and resetting the current Daily Bump works the same as Flat Rate. Please read the Flat Rate Section above for reference.
Minimum Work Day
If you work a day that is shorter than the Minimum Work Day, you charge the for the minimum amount of hours worked rather than for the actual hours worked.
In the example below, the crew member worked 5.5 Hours but they were booked on an 8 Hour Rate. The Minimum Work Day is 8 Hours so they charge for 8 Hours even though they only worked 5.5 Hours.
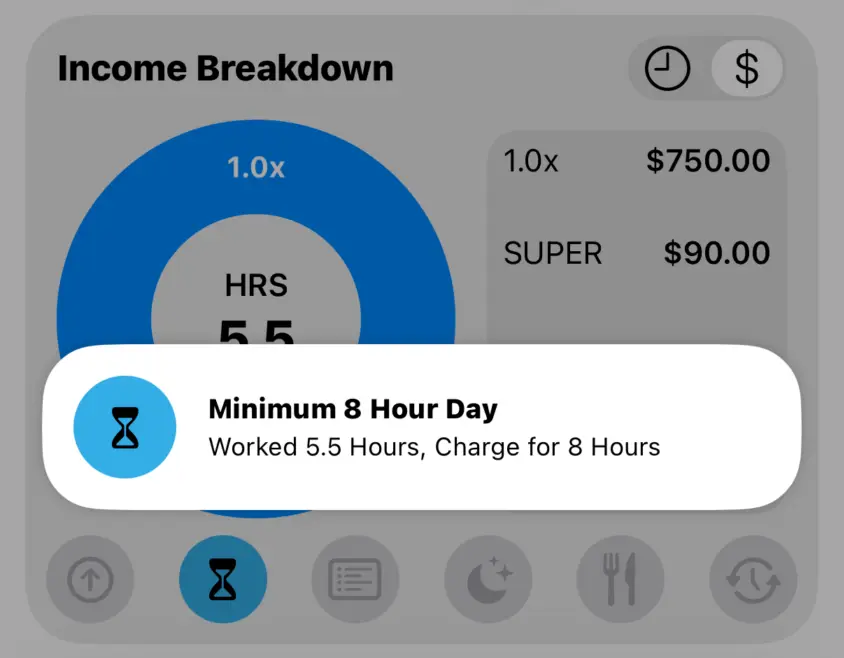
Minimum Work Day is set via Job Settings when Editing a Job. It can be disabled if you wish to only charge for hours worked.
Overtime Rules
Overtime Rules are used when different penalties are applicable based on the day of the week. This can be 6th Day and 7th Day Penalties or things like 2.0x on Sundays. They will trigger automatically if the Work Day meets the criteria for a given rule.
The Overtime Rules Popup gives you a breakdown of how penalties have changed. In the example below, it shows that 1.0x is changed to 2.0x for 8 Hours which results in $750.00 more income earned.
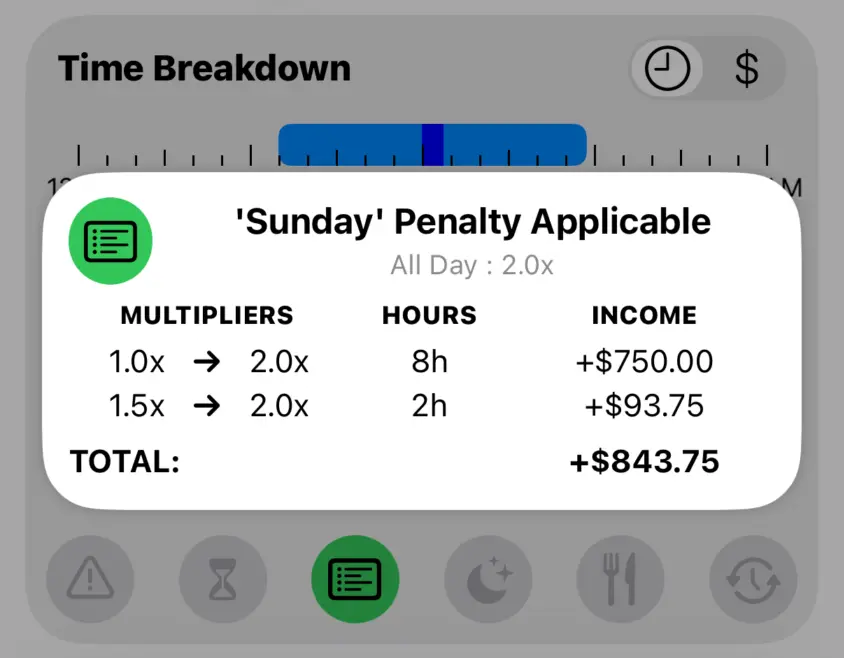
The Income Breakdown will display RULE for the income earned based on Overtime Rules. It will also display a green dot next to penalties that have been modified by an Overtime Rule.
Overtime Rules are set via Job Settings when Editing a Job.
Tap the button in the top left of the popup if you want to Ignore a Penalty. Income earned from the Overtime Rule will be ignored until you Stop Ignoring the Penalty.

Night Loadings
Night Loadings are triggered when your Start Time or Finish Time overlaps with the times set for a Night Loading Calculation.
Income earned from a Night Loading considers your Current Penalty (1.0x, 1.5x, 2.0x) and will add additional income to match what is specified in the Night Loading Calculation.
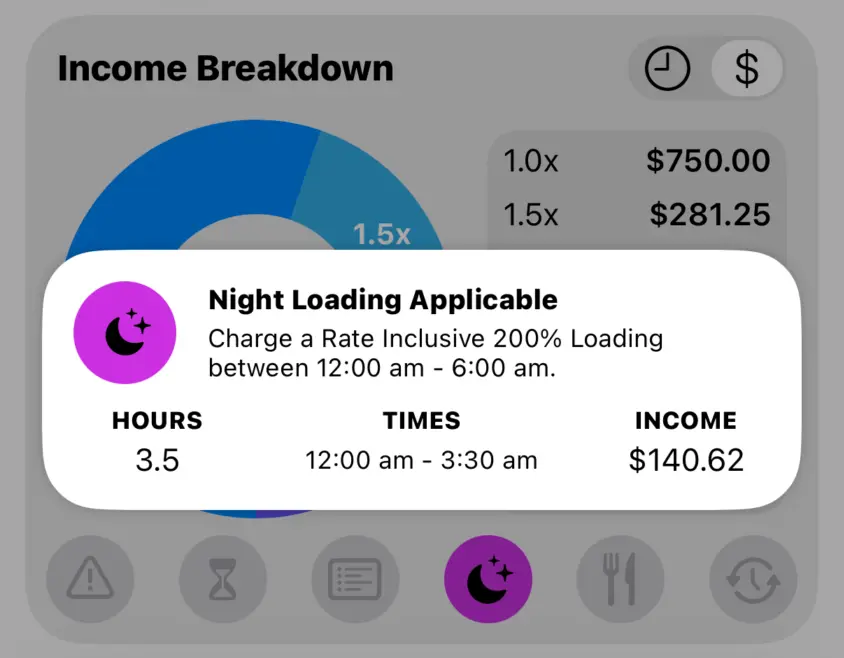
Night Loadings are set via Job Settings when Editing a Job.
Tap the button in the top left of the popup if you want to Ignore Night Loadings. Income earned from Night Loadings will be ignored until you Stop Ignoring Night Loading.

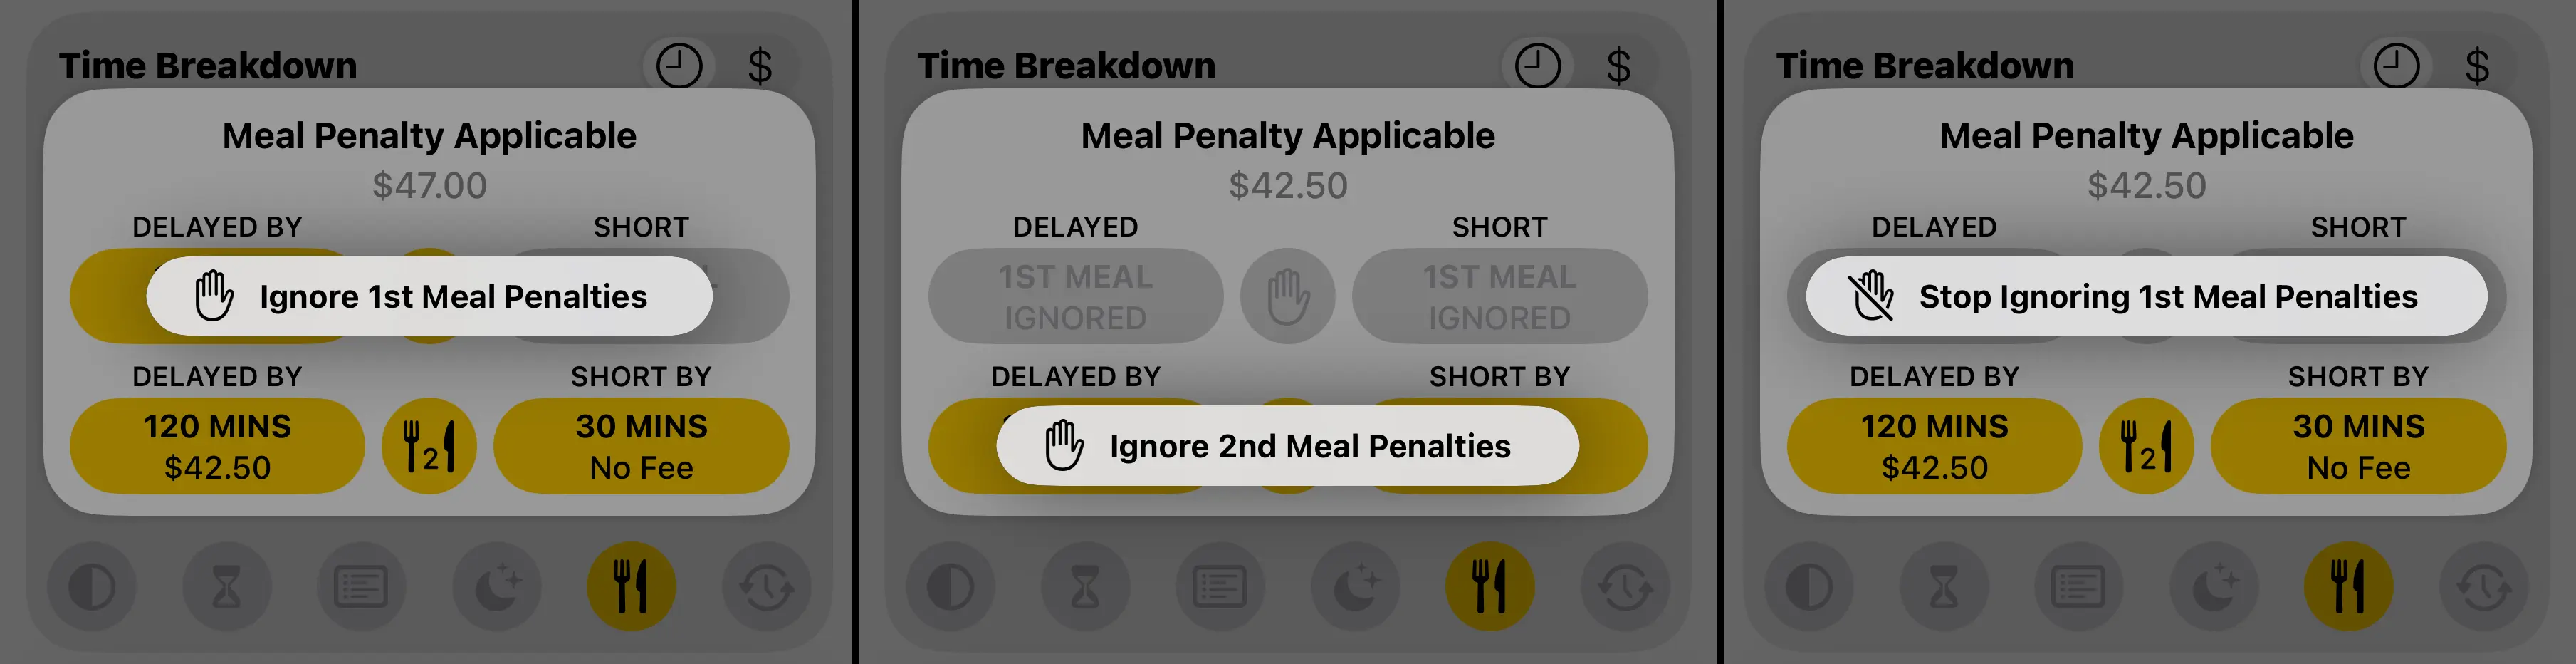
Meal Penalties
The Meal Start and Meal Length of your 1st Meal and 2nd Meal are checked against the Meal Penalty Calculation. If a Delayed Meal Break or Short Meal Break is detcted, the corresponding penalty will be automatically applied.
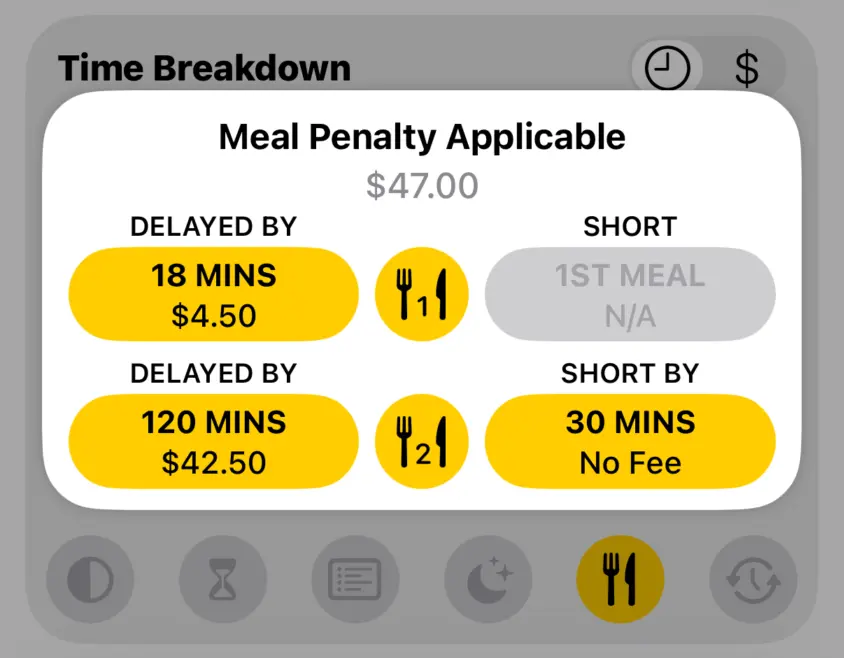
Meal Penalties are set via Job Settings when Editing a Job.
Tap the button in the middle of the popup if you want to Ignore Meal Penalties. You can ignore 1st Meal and 2nd Meal seperately. Income earned from Meal Penalties will be ignored until you Stop Ignoring Meal Penalties.
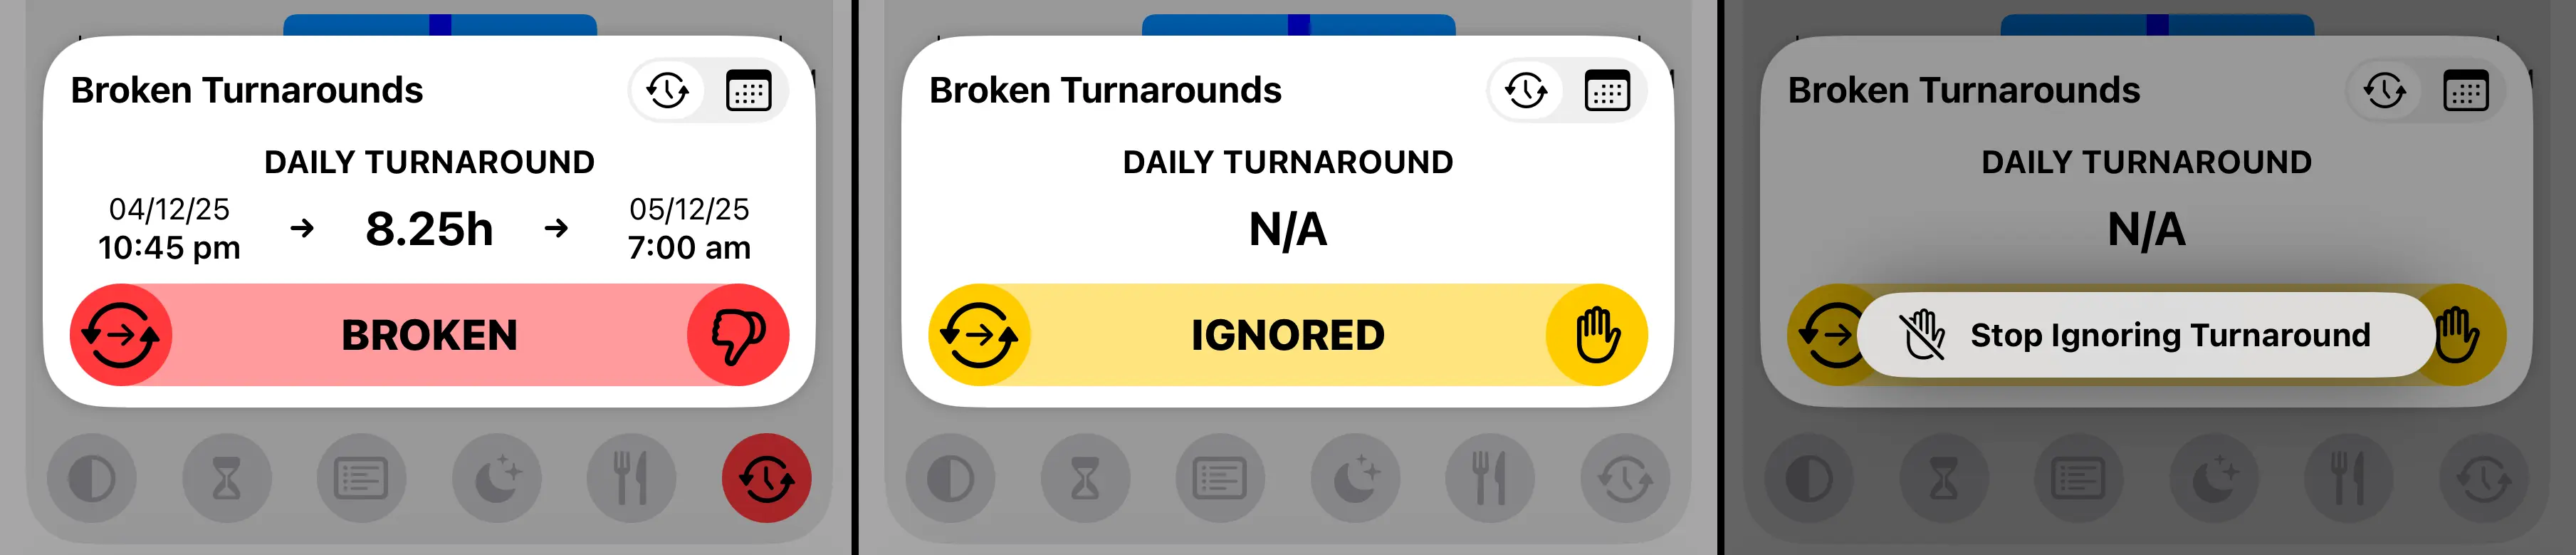
Turnarounds
Crew Call will automatically check your Turnaround Times to make sure you are getting an appropriate break between Work Days. It will calculate the hours between your Finish Time on one day and your Start Time the next day.
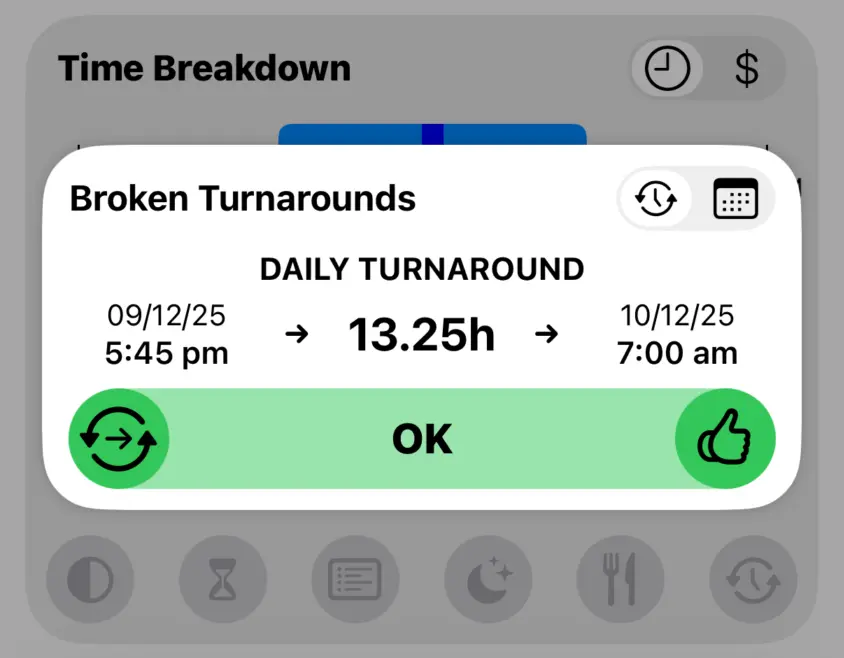
If your Turnaround Time is too short it will flag that you have Broken Turnaround. The duration of each Turnaround is defined by the Turnaround Calculation.
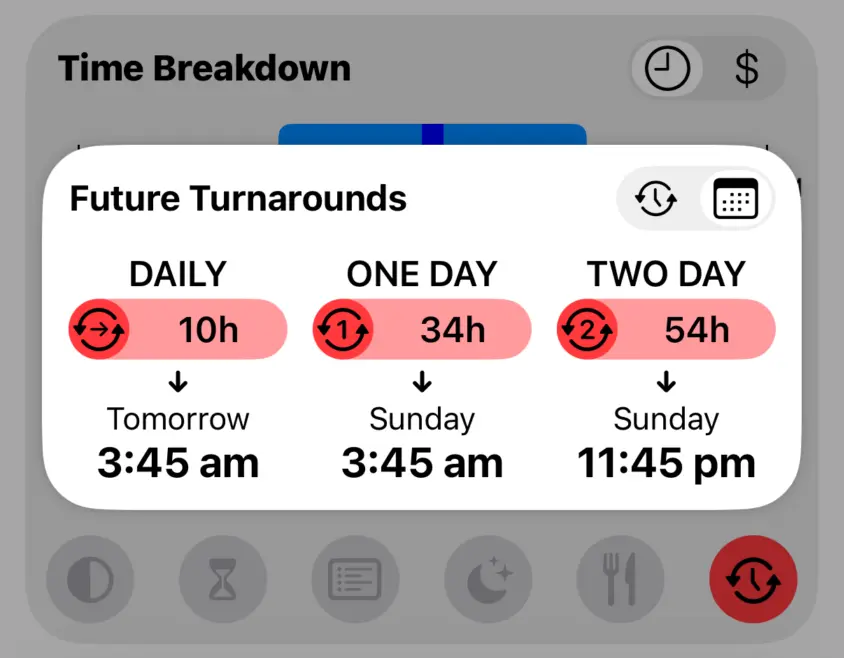
Next Day Turnaround is used day to day.
One Day Turnaround is used when shooting a 6 Day Week.
Two Day Turnaround is used when shooting a 5 Day Week.
Crew Call knows which Turnaround to apply based on Work Days that have been logged in the current, previous and next Work Weeks.
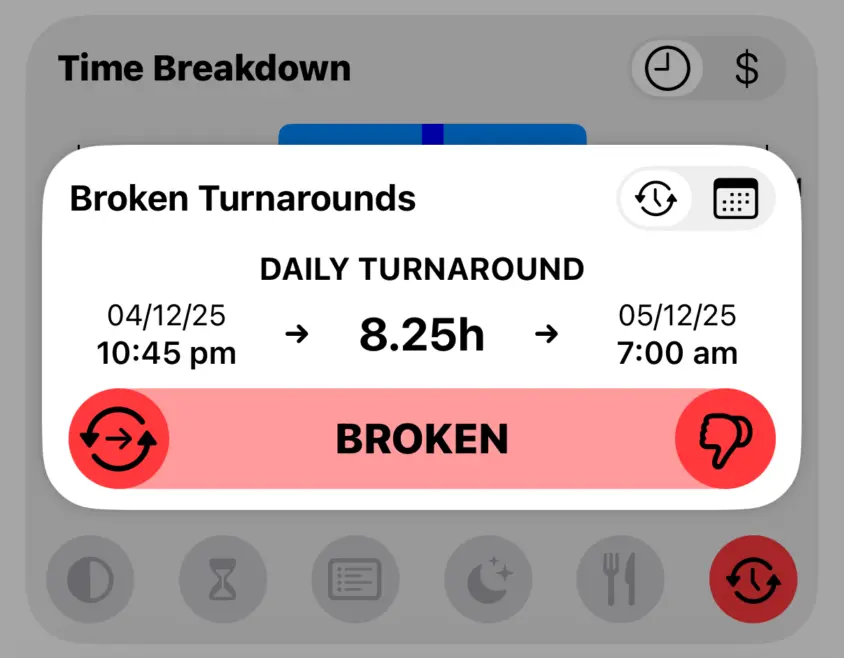
Tap the control in the top right of the Turnaround Popup to toggle between Broken Turnarounds and Future Turnarounds.
Future Turnarounds will tell you your Next Day, One Day and Two Day Turnaround Times for the Current Work Day. This allows you to easily check when you can start the next day if production ask you to start on turnaround.
Turnarounds are set via Job Settings when Editing a Job.
Tap the button at the bottom of the popup if you want to Ignore Turnarounds. Currently there is no income earned from Broken Turnarounds in Crew Call, the ignore option is only used to disable the highlight indicating that you have Broken Tunraround.